password
type
status
date
slug
summary
tags
category
Property
Oct 27, 2025 06:54 AM
URL
icon

Updated: September 19th, 2024.
Tracking page views on regular websites is fairly easy: you add a tracking code to every page, and done! Whenever a visitor clicks an internal link, a browser window refreshes, and a new page view event is sent to Google Analytics.
But there are more nuances regarding single-page websites (or web applications). Even though Google Analytics 4 now has a built-in tracking of such pageviews, it doesn’t always work out of the box. And some websites are just really inconvenient from the web tracking standpoint.
The result? Only the first page view is tracked. All the subsequent pages are not captured (until the visitor completely refreshes the page).
To mitigate this, you must do additional configuration to track such websites/web apps. But don’t worry; I will show you three methods to track single-page applications with Google Analytics 4 and Google Tag Manager). This is also known as virtual pageview tracking with GA4 and GTM.
Why does this happen? Let me show you.
Table of Contents
Here’s what you will learn in this article
- Method #2. Try the History Change trigger
- How many History events do you see?
- Inspect the dataLayer.push and create variables
- Sending data to Google Analytics
- Event tag for the page_view event
- Google Tag with the “update” parameter
- Fire the “update” tag before the page_view tag
- Should Google tag automatically track the first page_view?
- The summary of the History change setup
- Test the setup
What is a Single Page App (SPA) / Website?
Single Page Application (SPA) is a web application or website that loads all of the resources required to navigate throughout the site on the first page load. As the user clicks links/buttons and interacts with the page, subsequent content is loaded dynamically (and the page technically does not reload, even though it might look different).
In older versions of Google Analytics, this caused problems, because all of the necessary tracking is loaded once, and the page does not reload during the entire user session. That is why we only got one page view in reports. The URLs might change, but that is to give you the perception of separate pages.
As for Google Analytics 4, Enhanced Measurement offers built-in pageview tracking in such situations. However, that does not work on all single-page websites. Thus, some additional GTM configuration might be needed.
If the term “single page application” does not ring a bell, maybe names like React, Angular, Vue.js, and Gatsby.js are familiar? Websites built with these (or similar) JavaScript frameworks are single-page applications.
Continue reading, and I’ll show you how deep the rabbit hole goes.
Install Google Tag Manager
If you haven’t yet, install the Google Tag Manager on a single-page web app or website. I have published a blog post with several options for your consideration. Also, check whether your Google Tag Manager is working properly.
Done? Great, let’s proceed.
Multiple ways of tracking SPA + How to read this guide
There are three techniques explained in this guide:
- Method #1. built-in tracking of Google Analytics 4 (this is the quickest one)
- Method #2. Working with a History Change listener (within GTM)
- Method #3. asking a developer to push pageview data to the Data Layer every time a visitor navigates from one page to another.
But before we jump right into the configuration part, we first need to evaluate the context and find out which tracking option to choose. Just like in my other popular blog post about form tracking, to make complex things a bit more understandable, I’ve created a flow chart that can help you decide which tracking method to choose (or, in many cases, there will be only one method possible for you).
Note: If all 3 tracking options are possible for you, you should go with Method 3: developer’s help + dataLayer.push (as it’s proven to be the most robust).
First, let’s take a quick look at it, and then we’ll dive deeper into each step.
Do you need this guide at all?
The first diamond in the flow chart above asks: When you navigate between pages, do you see new pages in the GTM preview mode?
What does this question mean? By default, the Google Analytics tag fires every time a page is loaded (meaning that the page must load completely from scratch).
Together with the page’s code, the Tag Manager JavaScript snippet is also loaded from scratch. So if you navigate from page A to B, you will see a new page title here. Every time this appears, it means that the page was completely (re)loaded.
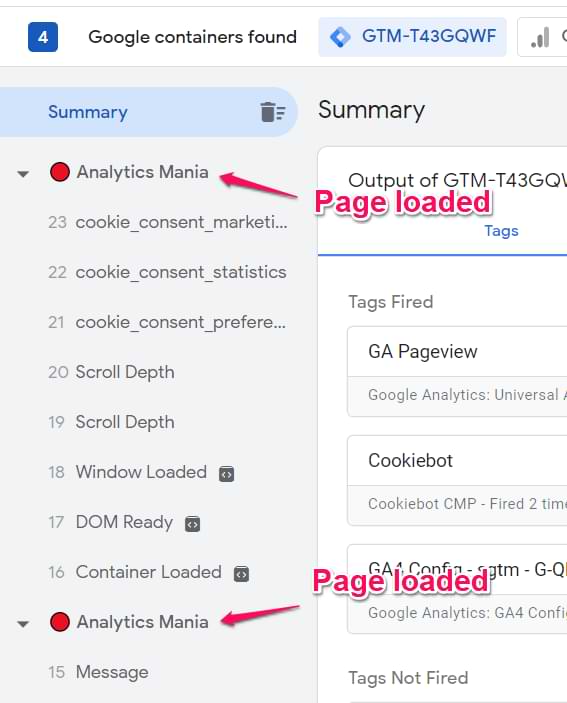
So if you notice a page title on the left side of the sidebar on every pageview, you are not working with a single-page application. Read my GTM guide for beginners instead. I’ve explained there how to track your first GA pageview with Tag Manager.
On the other hand, if you’re really working with a SPA, every time you navigate from page A to page B, you won’t see the page title. Why?
That’s because in web tracking, “pageview” usually is when the page document is loaded, and JavaScript tracking codes are loaded together with it (including Pageview tags). However, in SPA, all the subsequent “pageviews” happen dynamically without loading/reloading the page document. That’s why by default, Tag Manager does not track “dynamic” pageviews.
Because of this, you need to do some additional configuration (and maybe even with the help of a developer).
Alright, so the first question is answered. If you are indeed working with a SPA, let’s move to the next question in our flow chart.
Does the page URL change (when you navigate from page A to B)?
You must ask the developer’s help if the URL does not change. Immediately skip to the chapter “Track SPA with GTM and developer’s help” of this blog post and continue reading from there. If the URL indeed changed, you still have chances to use the History Change listener on your own, or maybe the built-in GA4 functionality will take care of this automatically.
URL changes might look different based on the website you’re on. On some websites, the URL fragment changes (that’s the part of the URL after the hashmark #). On others, the URL change might look casual, like on a regular website (e.g., from /home/ to /home/contact-us), etc.
If you confirm that the URL changes, let’s move to another step.
Method #1. Track page views with GA4 Enhanced Measurement
Note: Enhanced measurement provides a bunch of event-tracking capabilities, but many of them can work inaccurately (e.g., scroll tracking). Thus it will make sense to disable all the non-pageview-related tracking (scroll, site search, click tracking, etc.).
Let’s see if the built-in page view tracking in GA4 works for you.
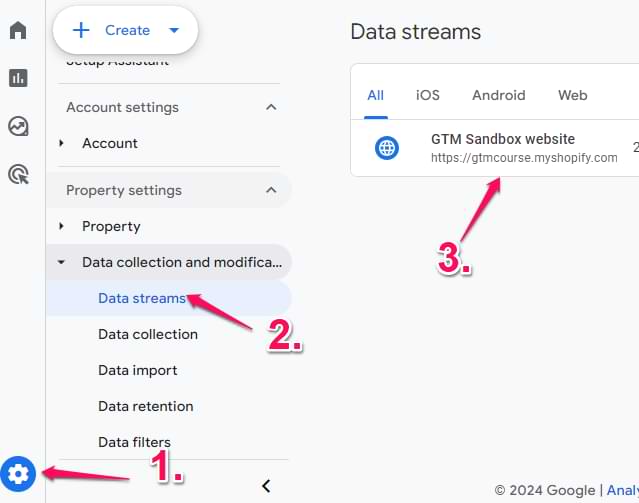
In Google Analytics 4, go to Admin > Data Streams and click on your web data stream.
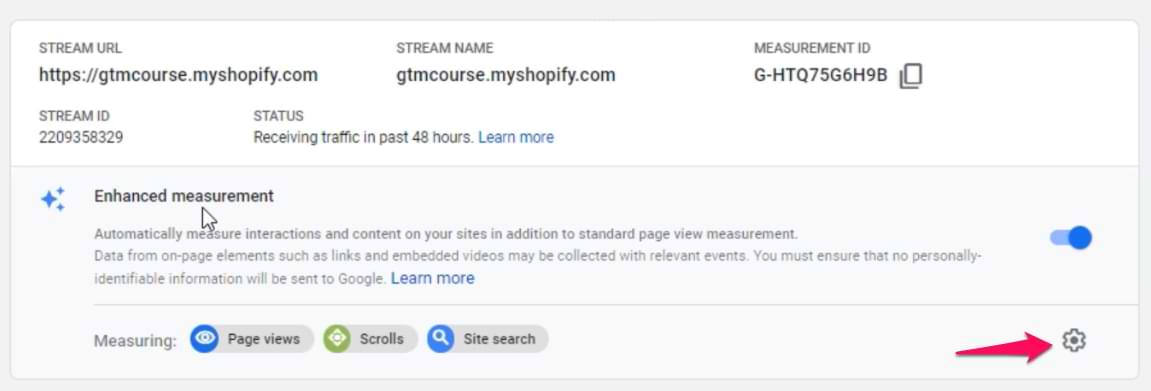
Then click the gear icon next to Enhanced Measurement (also, make sure that Enhanced Measurement is enabled).
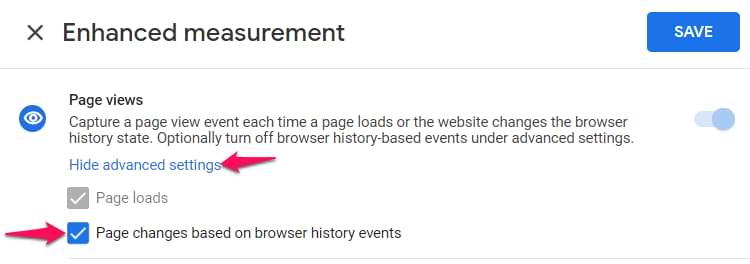
Then click Show advanced settings under Page views and check if the Page changes based on browser history events checkbox is enabled. This will allow GA4 to automatically try every time the URL changes (or at least try to do so).
After that, save all the changes in GA4. In Google Tag Manager, enable the Preview and Debug mode and then navigate to your single-page application/website. Try navigating from one page to another.
In the preview mode of GTM, you should start seeing History Change events, and their technical event name is gtm.historyChange-v2. You will see it while having the GTM container selected at the top of the preview mode.
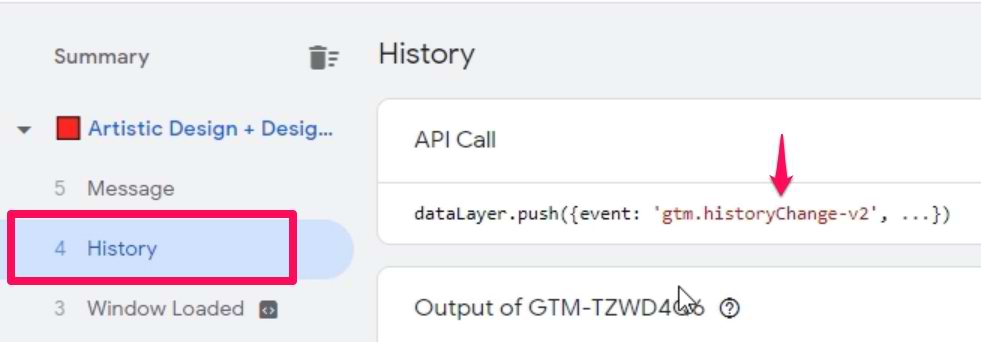
If you see that, click on your GA4 measurement ID at the top of the preview mode and check if you see multiple Page View events being sent to Google Analytics 4. If yes, then it’s good news. GA4 will be able to track pageviews of your single-page application automatically, and you don’t need any additional configuration.
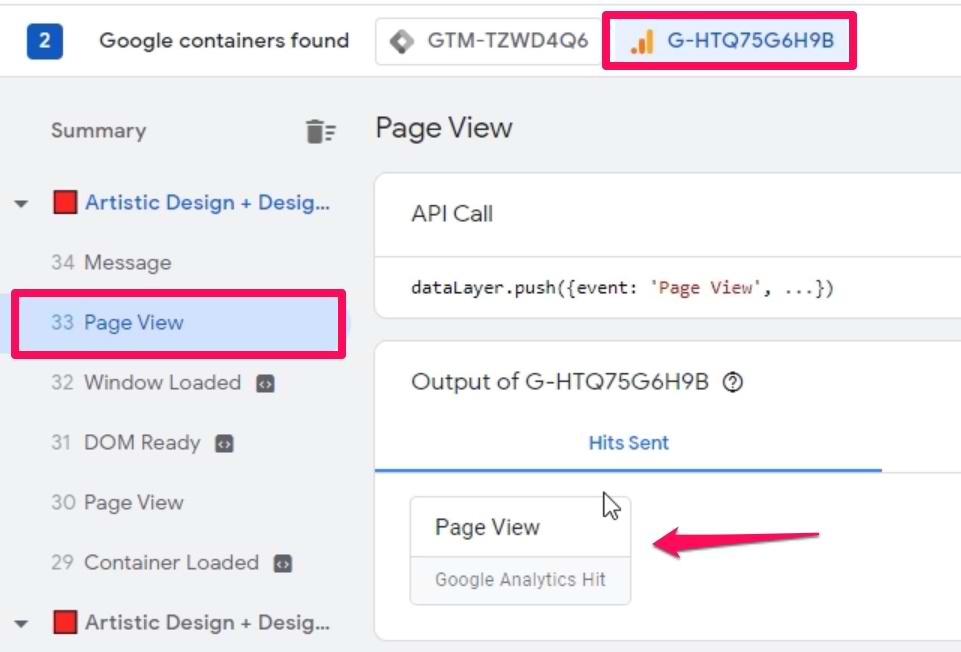
Also, check the DebugView of GA4 to make sure that page_view events are coming with proper page_title and page_location parameters.
If you cannot see the History Change events (or the page_view events are not being sent to GA4), then go to the next chapter of this blog post.
Method #2. Try the History Change trigger
The most robust solution for tracking single-page applications is cooperation with a developer. Without a doubt. However, sometimes the developers are unavailable, so we might have to work with what we have. That’s why this method is also available as an alternative.
In Google Tag Manager, go to Triggers > New > History Change and create a trigger with the following settings:
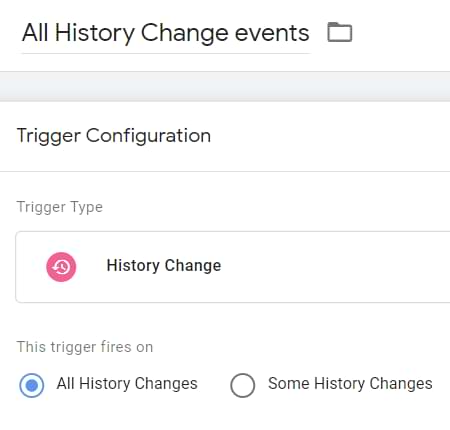
Then we need to test if it works. Enable Google Tag Manager Debug mode. Click Preview button in the top right corner of your GTM interface (near Submit button).
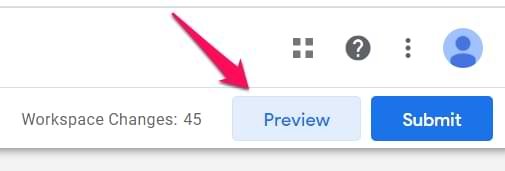
Once you click the Preview button, a new browser tab will open with tagassistant.google.com. If it does not, read this guide.
A popup there will ask you to enter the URL you want to test and debug. It might be a homepage’s address or a specific page’s URL, and then press Start.
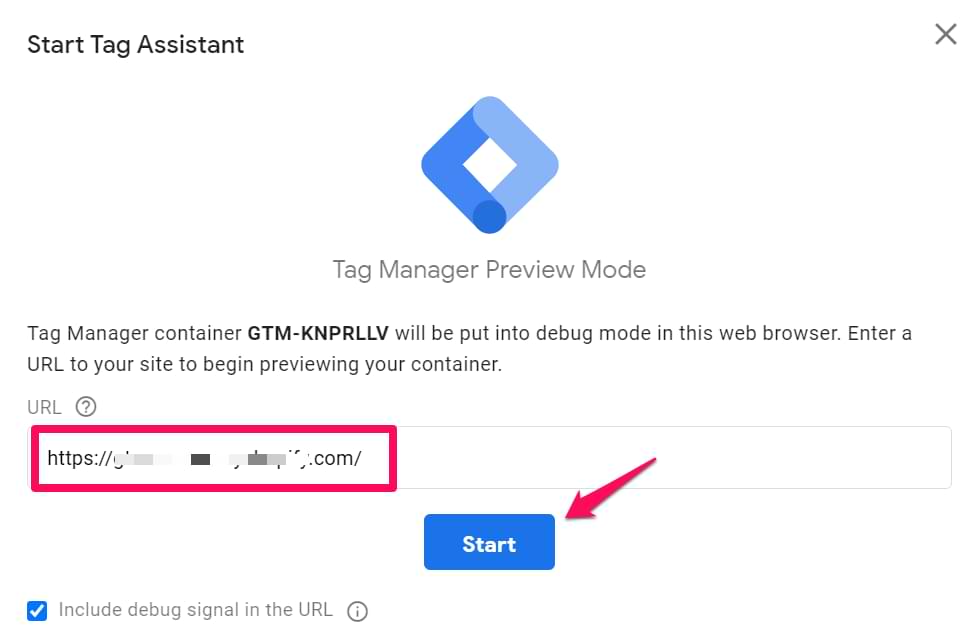
A new browser tab (or window) should appear where you will see the URL you entered in the previous popup. At the bottom of that page/tab, you must see the following badge:

Click (or scroll) through various sections of the single-page web app (or website) to change the URL. After the change happens, look closely at the event stream in the Preview and Debug console.
Did the History event appear? If yes, that’s good news! If not, skip to the chapter where I explain how to cooperate with developers.
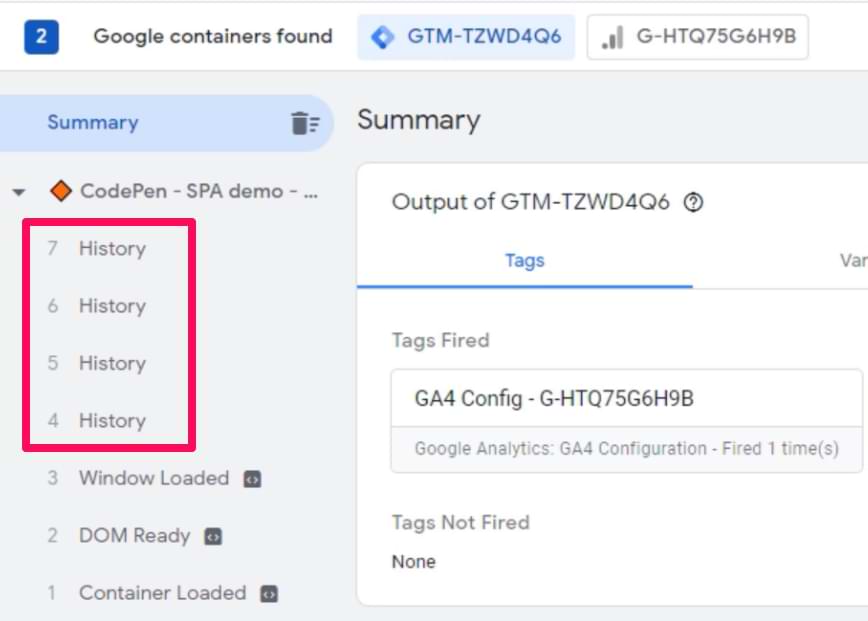
On some single-page applications, you might see several History events occur simultaneously. That’s why you need to answer one more question.
How many History events do you see when you navigate from Page A to Page B?
Some websites may be coded in a particular way that will cause multiple history events to appear simultaneously in the GTM preview mode. If you face this situation, read this guide, where I explain how to configure your trigger to work only with certain History Change events (and thus avoid duplicates). Once you read that, come back to this guide.
Inspect the dataLayer.push (of a history event) and create variables
When you see the History event in the GTM preview mode, click it and then expand the API call (to see the content of the dataLayer.push).
The most important things for us are:
- The current URL
- And the previous URL
In the example below, they are available as gtm.oldUrl and gtm.newUrl.
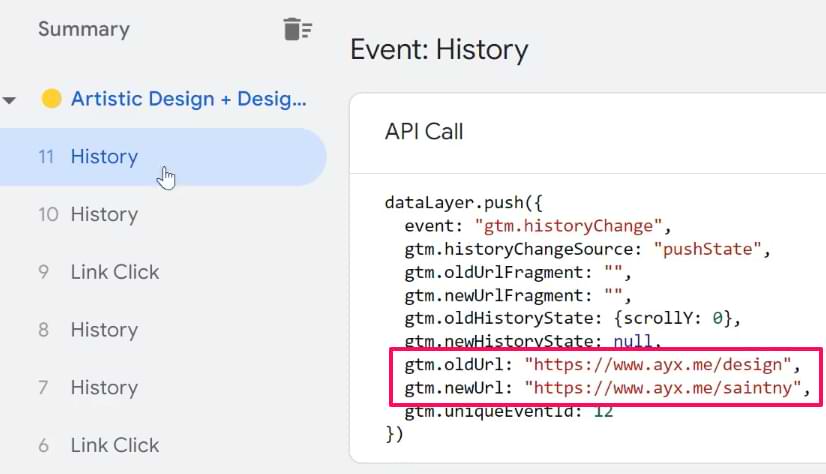
Let’s create data layer variables for them. If your dataLayer structure is different, you’ll need to adapt.
Go to Google Tag Manager > Variables > Variable Configuration > New > Data Layer variable and enter “gtm.oldUrl”.
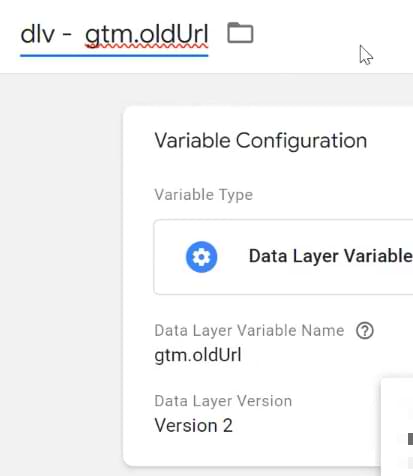
Save the variable. Do the same thing for the gtm.newUrl.
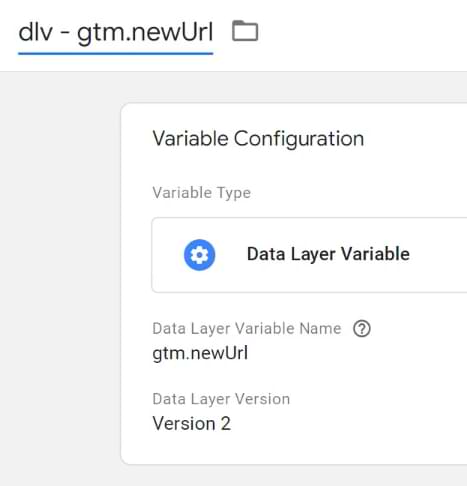
We’ll need these variables in the next chapter.
Sending data to Google Analytics (with the History Change trigger)
After you make sure that the History Change trigger works fine, you will have to send those pageviews to Google Analytics.
If you choose this route, first, disable History event tracking in GA4. You can do that by going to Admin > Data Streams > Select your website stream > Enhanced Measurement > and disabling “Page changes based on browser history events.”
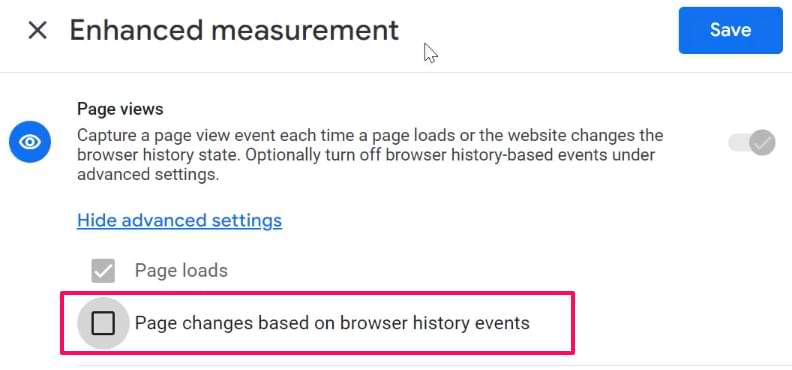
Important side note. On some websites, you might notice that your single-page app’s pageviews are tracked properly, BUT in the reports, you might notice that the title of the tracked page always belongs to the previous page. If you notice this, you will need to implement single-page app tracking with the developer’s help, or you can delay the History Change event.
Event tag for the page_view event
Google Analytics 4 is an event-based analytics platform. It means that everything is an event. Pageview, click, purchase, etc. Every time a history event happens, we’ll need to send a page_view to GA4.
In Google Tag Manager, go to Tags > New > Google Analytics > GA4 event tag and enter the following settings:
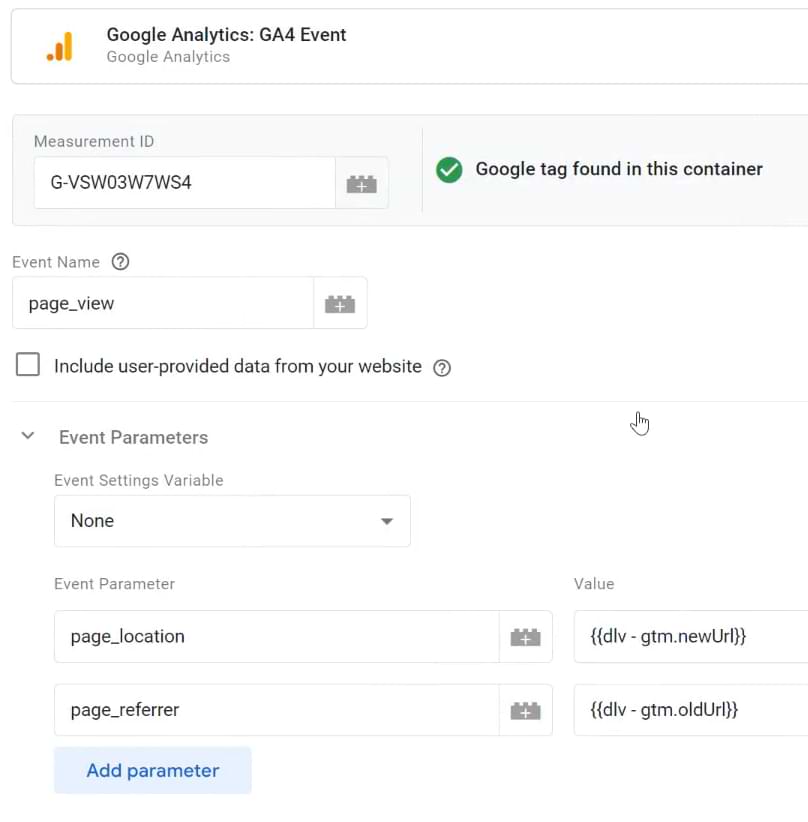
Your Measurement ID should be different. In this tag, I added two event parameters:
- page_location (its value is the gtm.newUrl data layer variable)
- page_referrer (its value is the gtm.oldUrl data layer variable)
If you are using a Google Analytics 4 event settings variable, then include these parameters there.
If your page URLs contain a hashmark (#), then you might need to create different variables (because gtm.newUrl and gtm.oldUrl don’t include #). A solution for the current URL could be a JavaScript variable called window.location.href.
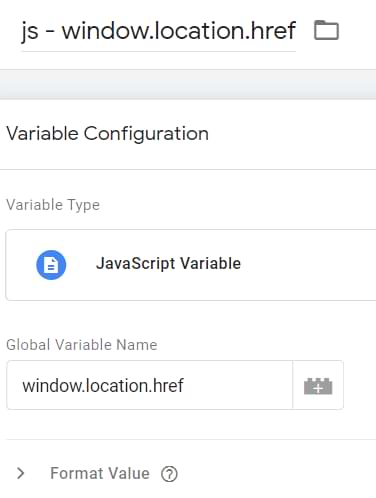
You can use that as the value of page_location.
Finally, assign the History Event trigger to the GA4 event tag (page_view).
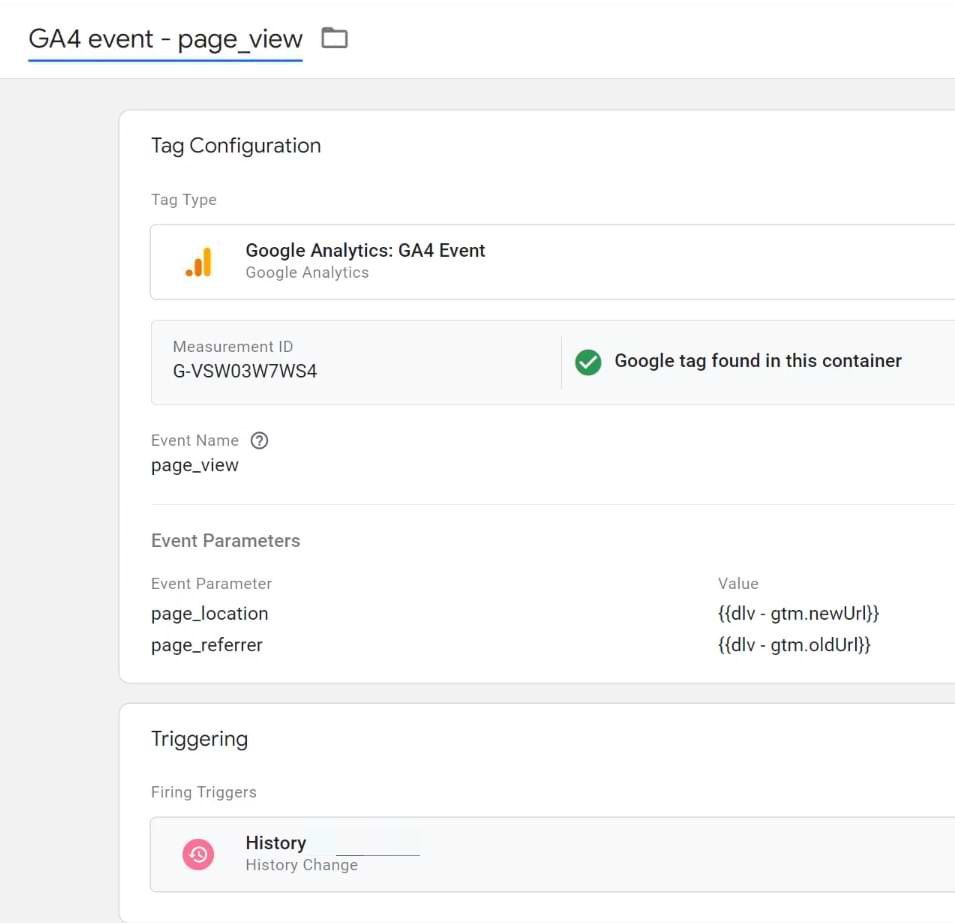
Note: if you are not using a GA4 event settings variable, you must override page_location and page_referrer manually in all GA4 event tags.
Google Tag with the “update” parameter
By now, you should have two tags directly related to the single-page application tracking:
- The page_view event tag
- And the Google Tag (that you were supposed to have even before starting to read this article). That’s how you should have installed GA4.
An example of a Google Tag might look like this:
Yours might have more customization. Mine is just the bare minimum. The basic stuff. Keep your tag as it is.
But when the page’s URL changes, you will have to inform the Google Tag that there were some updates.
This can be done by copying your main Google Tag and adding the following changes (keep other original settings unmodified):
- update means that Google tag will be informed about changes (no additional page_view will be sent by this tag). This is needed for automatically tracked events, such as user_engagement. Together with this command we will send what kind of changes happened:
- page_location value changed
- page_referrer also changed
This is needed to avoid a phenomenon called rogue referral. This will help with the attribution. Even though, at one point, Google announced that they are handling this automatically, I don’t trust them I was let down too many times; thus, I will handle it myself.
IMPORTANT: this tag should not have a trigger. Save this tag without it (soon, you’ll learn why).
Fire the “update” tag before the page_view tag
Go back to the page_view event tag and then Advanced settings > Tag Sequencing > Fire a tag before GA4 page_view > select the “update” tag you recently created.
Save the tag.
Should the Google tag automatically track the first page_view?
By default, when the Google Tag fires, it sends the page_view to GA4. However, on some single-page applications, this might be a source of duplicate pageviews.
What should you do? Check what happens after you load/reload the page of your single-page application.
Does the History event appear in the preview mode every time you reload the page?
If you reload the page (without clicking anywhere else on your website) and you see this:
…then you should disable the automatic pageview tracking in the Google Tag.
If you already have the send_page_view=true, then change its value to false.
However, if History events don’t appear immediately after you refresh the page and they become visible only when you start navigating your website/web app, then don’t modify the Google Tag.
The summary of the History change setup
I understand that some steps in this guide can be confusing (because SPA tracking with GA4 is not an easy feat). Here’s what you should have:
- A regular Google Tag (that you were supposed to have before reading this guide). We did not do any changes here
- A history change trigger that fires when the URL changes. If you see multiple history change events, read this and make your trigger more precise.
- A GA4 event tag that sends the page_view event to GA4.
- Together with the event, we also send page_referrer and page_location. page_referrer is necessary if you want to avoid potential attribution issues. In my example, I used gtm.oldUrl and gtm.newUrl data layer variables but your situation might require using something different. What’s important is that newUrl shows the correct URL (including URL fragment (#) and URL parameters (e.g., UTMs) and the oldUrl at least shows the correct domain of the previous page.
- This tag should use the History Change trigger.
- In the page_view event tag, you should configure tag sequencing. Before this tag fires, a Google tag (with “update” parameter) should be activated.
Test the setup
After you configure and save everything, it’s time to check the setup. I briefly explain how to test your page_view tracking here.
Method #3: Track Single Page Applications with Google Tag Manager and Developer’s help
Most likely, you’ve reached this point because your History Change tracking attempts failed or you are simply curious to learn more.
If (for some reason) the History Change trigger isn’t working for you (or there was another reason which brought you to this section), there’s another option on how to track single-page web app with Google Tag Manager.
Ask a developer to activate a dataLayer.push code whenever a user navigates between pages/states of a website/web application.
Here’s a sample code snippet that the developer could use:
Note: Values of ‘pageUrl’, ‘previousUrl’, and ‘pageTitle’ parameters (in that code snippet) should be dynamically replaced with the URL (and title) of the page a visitor is currently viewing. A developer should take care of that. If the URL contains the # or question marks and some parameters, they should be included there too. If the URL contains some query parameters (e.g., UTM parameters, they should also be included).
Anyway, what does that code mean?
Whenever a user goes to a particular section of your page, a developer should activate that little bit of JavaScript code. It indicates that a “virtualPageview” has occurred, and the new page URL is https://www.mywebsite.com/something/?page#contact-us.
Then, you will use this dataLayer.push as a triggering condition in GTM (that activates the GA Pageview tag) and then send the title and page path (page over to GA.
To achieve this, complete the following steps:
- Create three variables (and include them in the GA4 event tag). If you don’t have the pageTitle, then create two variables. At least have pageUrl and previousUrl.
- Create a trigger (and assign it to the GA4 Event tag).
Variables
- Title: dlv – pageUrl (dlv stands for “Data Layer Variable”)
- Variable type: Data Layer Variable
- Data Layer Variable Name: pageUrl This variable will read the value of the pageUrl that was pushed to the Data Layer by a developer.
Create a 2nd variable:
- Title: dlv – pageTitle
- Variable type: Data Layer Variable
- Data Layer Variable Name: pageTitle
Create a 3rd variable:
- Title: dlv – previousUrl
- Variable type: Data Layer Variable
- Data Layer Variable Name: previousUrl
Trigger
- Title: Custom – virtualPageview
- Type: Custom Event
- Event name: virtualPageview
- This Trigger fires on: All Custom Events
Create a GA4 event tag
Go to Tags > New > GA4 event tag and enter the following configuration.
This time, I override three parameters (page_location, page_referrer and page_title). Their values are the Data Layer variables that I created in one of the previous chapters. Important: you will also need to do that in all other future GA4 event tags.
Set this tag to fire on a Custom Event trigger that you have also recently created.
Google Tag with the “update” parameter
By now, you should have two tags directly related to the single-page application tracking:
- The page_view event tag
- And the Google Tag (that you were supposed to have even before starting to read this article). That’s how you should have installed GA4.
An example of a Google Tag might look like this:
Yours might have more customization. Mine is just the bare minimum. Keep your tag as it is.
But when the page’s URL changes, you will have to inform the Google Tag that there were some updates.
This can be done by copying your main Google Tag and adding the following changes (keep other original settings unmodified):
- update means that Google tag will be informed about changes (no additional page_view will be sent by this tag). This is needed for automatically tracked events, such as user_engagement. Together with this command we will send what kind of changes happened:
- page_location value changed
- page_title was modified
- page_referrer also changed
This is needed to avoid a phenomenon called rogue referral. This will help with the attribution. Even though, at one point, Google announced that they are handling this automatically, I don’t trust them I was let down too many times; thus, I will handle it myself.
IMPORTANT: this tag should not have a trigger. Save this tag without it (soon, you’ll learn why).
Fire the “update” tag before the page_view tag
Go back to the page_view event tag and then Advanced settings > Tag Sequencing > Fire a tag before GA4 page_view > select the “update” tag you recently created.
Save the tag.
Should the Google tag automatically track the first page_view?
By default, when the Google Tag fires, it sends the page_view to GA4. However, on some single-page applications, this might be a source of duplicate pageviews.
What should you do? Check what happens after you load/reload the page of your single-page application.
Does the History event appear in the preview mode every time you reload the page?
If you reload the page (without clicking anywhere else on your website) and you see this:
…then you should disable the automatic pageview tracking in the Google Tag.
If you already have the send_page_view=true, then change its value to false.
However, if History events don’t appear immediately after you refresh the page and they become visible only when you start navigating your website/web app, then don’t modify the Google Tag.
The summary of this chapter
I understand that some steps in this chapter can be confusing (because SPA tracking with GA4 is not an easy feat). Here’s a summary:
- A regular Google Tag (that you were supposed to have before reading this guide). We did not make any changes here.
- We asked the developer to push virtualPageView event to the data layer when the page URL changes. Together with it, we asked to push pageUrl, pageTitle, and previousUrl. We created a trigger and 3 variables for that
- A GA4 event tag that sends the page_view event to GA4.
- Together with the event, we also send page_title, page_referrer and page_location. page_referrer is necessary if you want to avoid potential attribution issues. In my example, I used pageUrl and previousUrl data layer variables. What’s important is that pageUrl shows the correct URL (including URL fragment (#) and URL parameters (e.g., UTMs) and the previousUrl at least shows the correct domain of the previous page.
- This tag should use the History Change trigger.
- In the page_view event tag, you should configure tag sequencing. Before this tag fires, a Google tag (with “update” parameter) should be activated.
Test the setup
After you configure and save everything, it’s time to check the setup. I will briefly explain how to test your page_view in the next chapter.
Check the DebugView
Save all the changes in your container and enable/refresh the preview mode by clicking the Preview button in your GTM container. Then go to the GA4 DebugView (you will find it at Admin > DebugView).
When you load the first page of your single-page app, you should see one page_view event in the DebugView.
Check whether page_location and page_title parameters are correct and belong to the current page you are looking at.
Then start navigating your website/web app and check if the number of page_views that you see in the debug_view is correct and whether their parameters are correct.
Within the next 24 hours, you should start seeing your pageview data in Reports > Engagement > Pages and Screens reports of GA4.
Track Single Page Web App with Google Tag Manager: Conclusion
The problem with single-page web apps or websites is that regular pageview tracking does not work. All necessary code is loaded once, and the page does not reload during the entire user session. In some cases, GA4 might be able to track pageviews of single-page applications, but it does not cover all situations.
With certain configurations in Google Tag Manager (and possibly some input from your developer), you can still track them. In this blog post, I’ve explained the built-in GA4 solution and two other options on how to track single-page websites: use GTM’s built-in History Change trigger or cooperate with a developer.
If you’re not sure which method to choose, here’s a rule of thumb:
- If you have development resources, cooperating with a developer is a more robust option (in terms of tracking quality).
- But if those resources are unavailable right now, check the flow chart I’ve included at the beginning of this guide. However, there’s still a chance that, eventually, you’ll end up asking for the developer’s input.
If you found this post about tracking a single-page web app with Google Tag Manager useful, consider subscribing to my newsletter. You’ll get various bonuses and useful stuff related to GTM.
Julius Fedorovicius
- 作者:Waicun Li
- 链接:🍀光照进来的地方 | 🌱 万斑皆有裂痕/article/ga4-tracking-spa
- 声明:本文采用 CC BY-NC-SA 4.0 许可协议,转载请注明出处。


